
DB AppMaker supports REST API that enables you to perform CRUD (Create, Read, Update and Delete) for the tables in the generated web application. You can issue the request to the API (e.g. via JavaScript code), get the response as JSON (Javascript Object Notation), interpret and present the result as you like it.
Note In this page we assume the API is <mysite>/api so the URL of the API is /api/, if you upload your site to a different folder, you need to change the URL in the following examples accordingly.
The REST API is implemented on the basis of the list, view, add, edit and delete pages supported for each table selected for generation. The basic supported API actions are add (Create), list / view (Read), edit (Update), delete (Delete), login (Authenticate User, if Security is enabled) and file (Get file content).
The standard exchange of information with the API is shown in the following examples (using the "cars" table of the demo database for demonstration):
Example 1 - Get a record by key (view action)
HTTP Request
GET /api/?action=view&object=cars&key=1 (or /api/view/cars/1, if URL Rewrite is enabled. See the URL Rewrite section for more details)
Accept: application/json
HTTP Response
200 OK
{
"success": true,
"version": "4.0.0",
"cars": {
"ID": 1,
"Trademark": 1,
...
}
}
Example 2 - Create a record (add action)
HTTP Request
POST /api/
action=add&object=cars&Trademark=1&...
Accept: application/json
If your data is JSON, the HTTP request should be:
POST /api/
{ "action": "add", "object": "cars", "Trademark": 1, ... }
Content-Type: application/json
Accept: application/json
Notes
HTTP Response (Success)
200 OK
{
"success": true,
"version": "4.0.0",
"cars": {
"ID": 16,
"Trademark": 1,
...
}
}
HTTP Response (Failure)
200 OK
{
"success": false,
"version": "4.0.0",
"failureMessage": "<failed reason>"
}
The following actions are supported. For list/view/file actions, the request is expected as HTTP GET, for other actions the request is expected as HTTP POST.
| Action | Parameters | Request | Response |
| list (Get list of records) | action=list object=<Table> start=<StartRecordNumber> (Optional, start record number, default = 1) recperpage=<RecordsPerPage> (Optional, record per page, default = [Records per page] setting, requires activating the [Selectable page sizes] setting) order=<Field> (Optional, sort by the specified field, requires activating the Sort setting in list page) ordertype=ASC|DESC (Optional, sort ascending (ASC) or descending (DESC), requires activating the Sort setting in list page) <Field>=<FieldValue> (Optional, search field by value, requires activating the [Advanced/Extended Search] setting in list page) |
Without URL Rewrite GET /api/?action=list&object=cars With URL Rewrite GET /api/list/cars |
Successful response { "success": true,"version": "4.0.0", "cars": [ { "ID": 1, "Trademark": 1, ... }, { "ID": 2, "Trademark": 1, ... } ] } Failed response { "success": false,"version": "4.0.0", "failureMessage": "<failed reason>" } |
| view (Get single record by key) | action=view object=<Table> <KeyField>=<KeyFieldValue> (key field value) |
Without URL Rewrite GET /api/?action=view&object=cars&ID=1 With URL Rewrite GET /api/view/cars/1 |
Successful response { "success": true, "version": "4.0.0", "cars": { "ID": 1, "Trademark": 1, ... } } Failed response See failed response for list |
| add (Insert a new record) | action=add object=<Table> <Field>=<FieldValue> (field to be inserted) |
Without URL Rewrite POST /api/ action=add&object=cars&Trademark=1&... With URL Rewrite POST /api/add/cars Trademark=1&... |
Successful response { "success": true, "version": "4.0.0", "cars": { "ID": 16, "Trademark": 1, ... } } Failed response See failed response for list |
| register (Register a new user in the User Table) | action=register <Field>=<FieldValue> (field to be inserted) |
Without URL Rewrite POST /api/ action=register&Username=newuser&... With URL Rewrite POST /api/register Username=newuser&... |
Successful response { "success": true, "version": "4.0.0", "employees": { "EmployeeID": 10, "Username": "newuser", ... } } Failed response See failed response for list |
| edit (Update an existing record by key) | action=edit object=<Table> <KeyField>=<KeyFieldValue> (key field value) <Field>=<FieldValue> (field to be updated) |
Without URL Rewrite POST /api/ action=edit&object=cars&ID=1&Trademark=2&... With URL Rewrite POST /api/edit/cars/1 Trademark=2&... |
Successful response { "success": true, "version": "4.0.0", "cars": { "Trademark": 2, ... } } Failed response See failed response for list |
| delete (Delete an existing record by key) | action=delete object=<Table> <KeyField>=<KeyFieldValue> (key field value) |
Without URL Rewrite POST /api/ action=delete&object=cars&ID=1 With URL Rewrite POST /api/delete/cars/1 |
Successful response { "success": true, "version": "4.0.0", "cars": { "ID": 1, "Trademark": 1, ... } } Failed response See failed response for list |
| login (Authenticate an user, see Authenticate user with JWT) | action=login username=<UserName> (user name value) password=<Password> (password value) |
Without URL Rewrite POST /api/ action=login&username=admin&password=master With URL Rewrite POST /api/login username=admin&password=master |
Successful response { "JWT": "<JsonWebToken>" } Failed response 401 Unauthorized |
| file (Get file content) | action=file object=<Table> field=<Field> <KeyField>=<KeyFieldValue> (key field value) |
Without URL Rewrite GET /api/?action=file&object=cars&field=Picture&key=1 With URL Rewrite GET /api/file/cars/Picture/1 |
Successful response For blob field (e.g. Picture field in cars table), binary content of file field with the correct content type For string field (e.g. Photo field in employees table), JSON response of file locations: { "Photo": { "EmpID1.jpg": "http://<my-site>/upload/EmpID1.jpg" }, "version": "4.0.0" } Failed response Empty response |
| upload (Upload files) | action=upload Notes
|
Without URL Rewrite POST /api/?action=upload With URL Rewrite POST /api/upload |
Successful response JSON response of file token and file info: { "success": true, "version": "4.0.0", "token": "<FileToken>", "files": [ ...file info...] } Failed response { "success": false, "version": "4.0.0", "files": [] } |
To improve the usability and search friendliness of the API URL, it is recommended that you setup URL Rewrite for your site so that the URL is much cleaner and easier to read and remember. Compare:
/api/?action=view&object=cars&ID=1, and
/api/view/cars/1
you will see the difference.
To use the URL Rewrite feature, all you need to do is to map all URL beyond the API path to the index.php page of the API path (i.e. /api/* => /api/index.php). You can enable the advanced setting Use URL Rewrite, the a .htaccess file (for Apache) and a web.config file (for IIS) will be generated for your web server.
Alternatively, you can manually set up your web server as follows.
For Apache, you need to enabled the mod_rewrite module by creating an .htaccess file in the API folder
with the following rewrite rules:
RewriteEngine On # Turn on the rewriting engine
RewriteRule ^.*$ /index.php [L,QSA]
To understand more about the Apache mod_rewrite module, please refer to Apache web site:
https://httpd.apache.org/docs/current/mod/mod_rewrite.html
For Internet Information Services (IIS), the URL Rewrite module is not built-in, so you need to download and install
the IIS URL Rewrite module from the microsoft web site below first:
https://www.iis.net/downloads/microsoft/url-rewrite
After installing, you should be able to see URL Rewrite module in IIS for your web site. To perform the mapping:
- Select your site
- Double click the URL Rewrite module
- Click Add Rule(s) and select Blank rule under Inbound rules
- Enter a Name (e.g. api) and set other settings as follows: (assume the "api" folder is <mysite>/api)
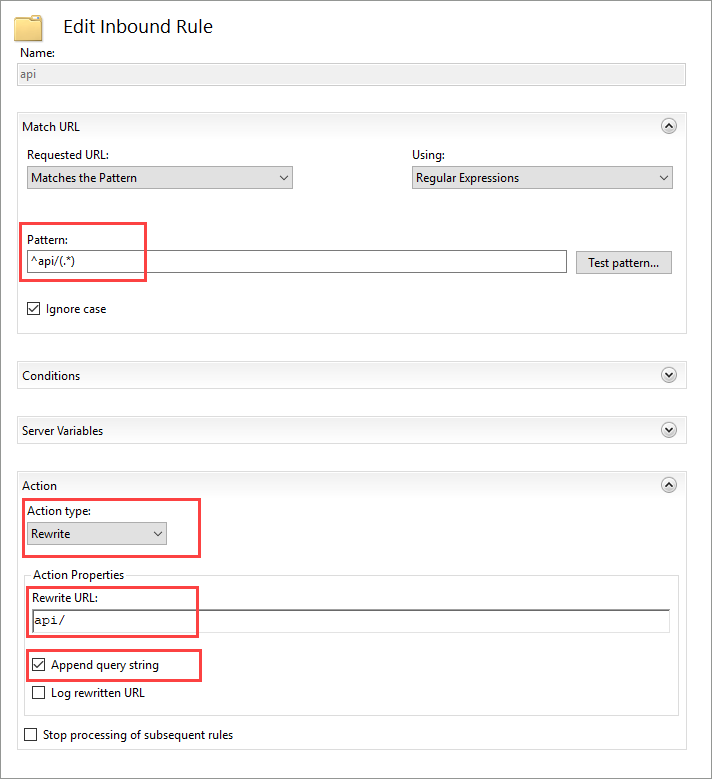
Click the Apply button to save the rule.
To understand more about the IIS URL Rewrite, please refer to the Microsoft article:
https://docs.microsoft.com/en-us/iis/extensions/url-rewrite-module/using-the-url-rewrite-module
REST API is stateless. Each API request is independent of each other and no session data is stored in the server to record the current state of the API requests. To access protected resources from the API, you need to authenticate the user first by getting a JSON Web Token (JWT) using the login action, then pass the JWT as an authentication header in subsequent API requests. To understand more about JWT, please visit: https://jwt.io/introduction/.
IMPORTANT
You can customize the following JWT parameters via Tools -> Advanced Settings.
| Settings | Description |
|---|---|
| API JWT signing secret key | The secret key used to sign the JSON Web Token (JWT). Non-optional, make sure you use different values for different projects and keep it in a secret place |
| API JWT signing algorithm | The algorithm used to sign the JWT. Default is "HS512". For more possible values refer to JWT web site: https://jwt.io/introduction/ |
| API JWT authorization header | The name of the header storing the JWT. Default value is "X-Authorization". IMPORTANT Whenever the user wants to access a protected route or resource, the user agent should send the JWT, typically in the Authorization header using the Bearer schema. The content of the header should look like the following: X-Authorization: Bearer <JWT token> |
| API access time after login (seconds) | Time you can access the protected resources after login. Default value is 0. |
| API expire time after login (seconds) | The JWT expiry time. Default value is 3600 (60 minutes). Users will need to authenticate again once the JWT expires. |
| API Access-Control-Allow-Origin header | The Access-Control-Allow-Origin. If unspecified, default value is "*" so the API can be accessed by external apps. |