
Install Xcode 8 (or newer).
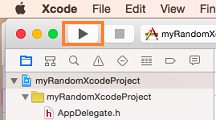
In the Launchpad, open Xcode.
![]()
Accept the license agreement and then close Xcode.
Install Ionic CLI globally (you may need sudo):
$ npm install -g @ionic/cli
You can verify your installation with the ionic --version command.
Devices you use for development need to be registered and added to the provisioning profile you use to sign your app.
You are recommended to use Xcode 8's automatic signing so that Xcode will create and manage these development signing assets for you when you need them.
For more information, please read the Signing workflow.
You'll need a provisioning profile to run your app on a device. Create one by using an Apple Developer account. You can also create one with your free Apple ID but there are limitations. See Supported Capabilities.
If your team already has a provisioning profile, see Option 3: Use your team's provisioning profile.
This type of provisioning profile gives you the most flexibility. For this option, you'll do these things:
Enroll in the Apple Developer program
Add your Apple ID to Accounts preferences
Assign the targets in your project to a team
Launch your app on a device
Let's go through each step in this process.
Enroll in the Apple Developer program
Add your Apple ID to Accounts preferences
Request a certificate
Connect your device to your Mac. Make sure that your device is turned on.
Start Xcode 8.
In Xcode, add your Apple ID.
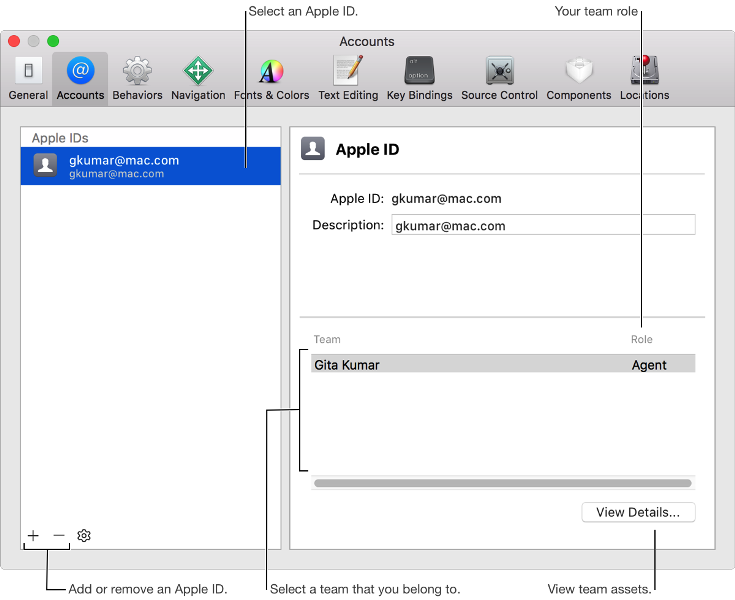
In the menu bar, choose Xcode->Preferences.
In the Accounts page, choose the View Details button.
In the account details page, choose the Create button next to the iOS Development signing identity.
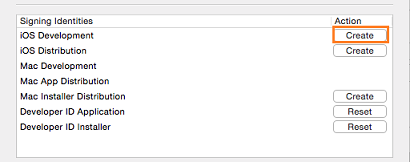
Choose the Done button to close the account details page.
Create an App ID
We'll use a wildcard App ID because it's the most flexible. You can use one for multiple apps. You need an explicit App ID (an App ID that you can use with only one app) only if you decide to enable certain services in your provisioning profile.
On your Mac, open Safari, and log into the Apple Developer Member Center.
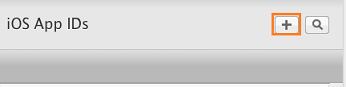
On the Member Center page, choose the Identifiers link.
Sometimes Xcode generates a wildcard App ID for you. Take a look at the list of App ID's. If any of these have a * in the ID field, then you have a wildcard App ID. If not, proceed to the next step.
If you don't have a wildcard App ID, choose the + button to create one.
The Registering an App ID page appears.
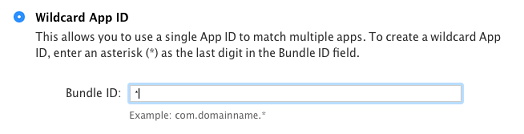
Choose the Wildcard App ID option and then place a * in the Bundle ID field.
Fill in the rest of the fields on that page, and then choose the Continue button.
In the Confirm your App ID page, choose the Submit button.
The Registration complete page appears.
Need more detail? see Registering App IDs.
Register your device
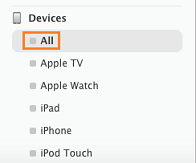
In the Certificates, Identifiers & Profiles page, choose the All link that is located under the Devices heading.
Choose the + button.

In the Registering a New Device or Multiple Devices page, provide the name and UDID of the device, and then choose the Continue button.
UDID stands for Unique Device Identifier. It's a 40-character string that uniquely identifies your device. You can find it by using Xcode or ITunes. See Locating Device ID's.
In the Review and register page, choose the Register button.
Need more detail? See Registering Devices Using Member Center
Create a provisioning profile
On the Member Center page, choose the Certificates, Identifiers & Profiles link.
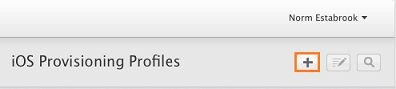
In the Certificates, Identifiers & Profiles page, choose the Provisioning Profiles link.
In the Provisioning Profiles page, choose the + button.
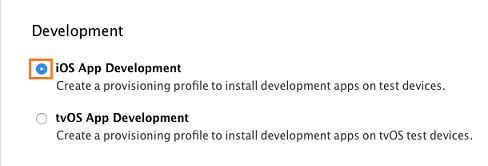
In the What type of provisioning profile do you need? page, choose the iOS App Development option, and then choose the Continue button.
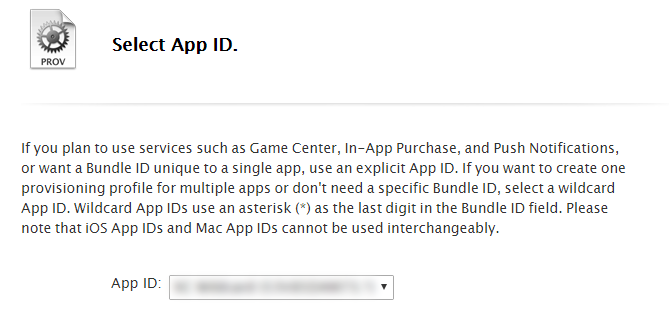
In the Select App ID page, choose the wildcard App ID that you just created, and then choose the Continue button.
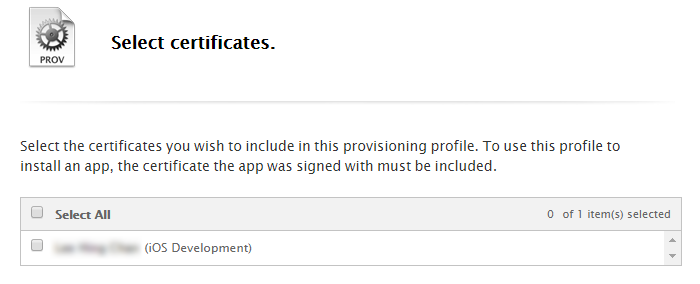
In the Select certificates page, select the checkbox next to the certificate that you created earlier, and then choose the Continue button.
In the Select devices page, select the checkbox next to the device that you registered earlier, and then choose the Continue button.
In the Name this profile and generate page, name your profile, and then choose the Continue button.
In the Your provisioning profile is ready page, choose the Download button.
Need more detail? See Creating provisioning profiles using Member Center
Download the provisioning profile in Xcode
Start Xcode. Go to Accounts preferences.
In the lower-left corner, click the Add button (+).
Choose Add Apple ID from the pop-up menu.
Enter your Apple ID and password and click Sign In. If you do not have an Apple ID, click create Apple ID. After creating the Apple ID, repeat above steps.
In the account details page, choose the Download button next to your provisioning profile's signing identity.

Choose the Done button to close the account details page.
Install the provisioning profile to your device
Connect your device to your Mac. Make sure that your device is turned on.
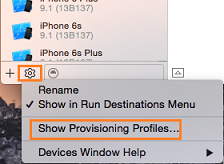
In the menu bar, choose Window->Devices.
In the Devices pane, select your device.
At the bottom of the Devices pane, choose the settings icon, and then choose the Show Provisioning Profiles.
In the Provisioning profiles installed on .. dialog box, choose the + icon.
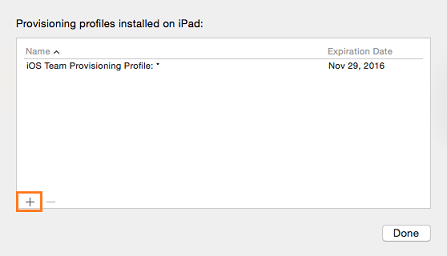
Navigate the location where you downloaded your provisioning profile, choose the file, and then choose the Install button.
In the In the Provisioning profiles installed on .. dialog box, choose the Done button.
First, take some time to review the limitations of this type of provisioning profile. If you're comfortable with those limitations,
Start Xcode 8.
In Xcode 8, add your Apple ID.
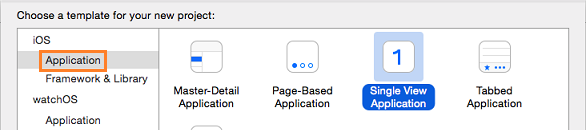
In Xcode 8, choose File->New->Project.
In the Choose a template for your new project dialog box, in the iOS group, choose the Application category, choose any template, and then choose the Next button.
Name your product, organization, and identifier anything you want, and then choose the Nextbutton.
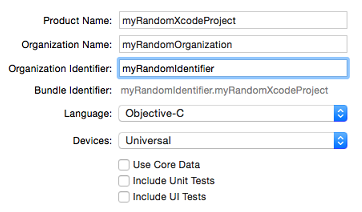
Choose a location to save your project, and then choose the Create button.
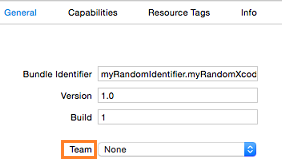
The General page of the project properties appears.
In the Team pop-up menu, choose your Apple ID.
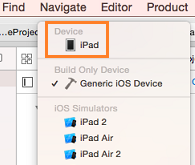
Connect your device to your Mac. Make sure that your device is turned on.
In the Scheme pop-up menu, choose your device.
If the device has the message version lower than deployment target, you can either update the operating system of your device or choose a version of iOS from the Deployment Target pop-up menu that matches the operating system version of your device.
If a Fix Issue button appears below the Team pop-up menu, choose that button.
Xcode creates a provisioning profile and the Fix Issue button disappears.
Choose the Run button to run your project.
Running your project, ensures that your provisioning profile works. Xcode installs your blank app to the device and then starts it.
If your team shares a provisioning profile, all you have to do is register your device with the profile and then download and install that profile onto your device.
Register the UDID of your device with the provisioning profile
UDID stands for Unique Device Identifier. It's a 40-character string that uniquely identifies your device. You can find it by using Xcode or ITunes.
Send that information to the person on your team who manages the provisioning profile. For the purpose of this discussion, we'll call that person the profile administrator.
If you have administrator access to the Apple Developer Account, you can register the device yourself. Here's the steps:
On your Mac, open Safari, and log into the Apple Developer Member Center.
In the Registering a New Device or Multiple Devices page, provide the name and UDID of the device, and then choose the Continue button.
In the Review and register page, choose the Register button.
For more details, read Add your Apple ID account.
Assign the targets in your project to a team
To sign your app, each target in your Xcode project must be assigned to the same team.
In the project editor, select the target from the Project/Target pop-up menu.
Click General and expand the disclosure triangle next to Signing to reveal the settings.
Select "Automatically manage signing"
Choose your team from the Team pop-up menu.
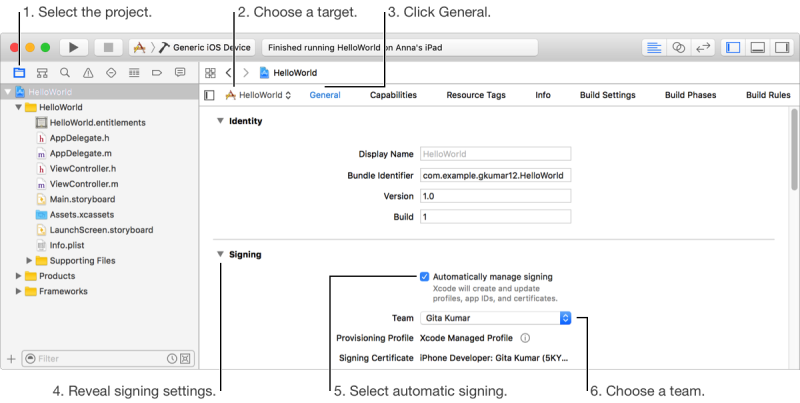
For more details, read Assign a project to a team.
Launch an app on a device
Connect the device to your Mac.
In the toolbar, choose your device from the Scheme menu. If this is the first time you are using a device for development, you may need to wait for Xcode to enable the device before it appears in the Scheme menu. In the devices window, you can check the status of a connected device.
If the device appears under Unavailable Device in the Scheme menu, hover the mouse over the device, read the reason, and fix the problem.
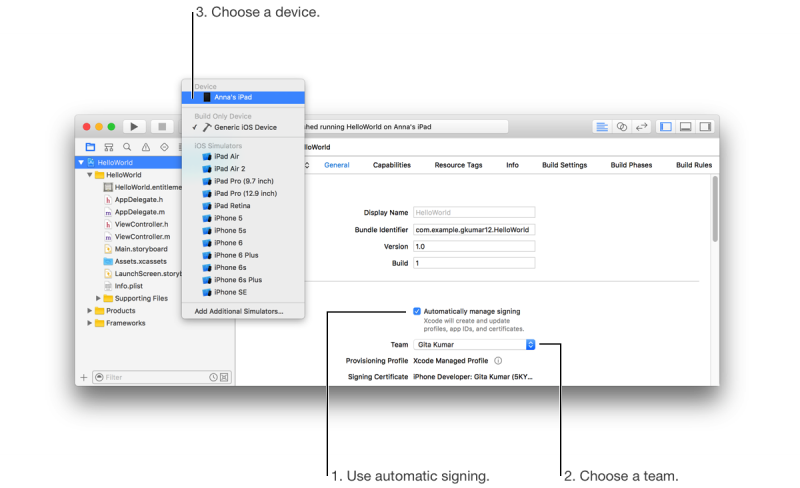
In the toolbar, click the Run button. Xcode should install and launche the app on the device.
If a form appears asking if Xcode should register the device, just click Register Device.
For more details, read Launch an app on a device