Custom Templates
What It Is
The applicatons generated by DB AppMaker use Ionic Framework and Angular. Ionic apps are made of high-level building blocks called Components, which allow you to quickly construct the UI for your app.
Each page of the app has a HTML template. By default, DB AppMaker will automatically create the HTML template (*.html) for the table based on the selected fields for the page (see Field Setup). However, you can also provide your own Custom Templates to replace specific content of a page.
Note Do not confuse
Custom Template (which is a table level setting within a project) with customizing the whole template zip file. If you want to customize the whole generated app or customize something for all tables and all projects, you should customize the template zip file, see
Customizing Template.
How to Use
To enter your Custom Template, perform the following steps:
- Select the table in the database pane,
- Select the Code tab,
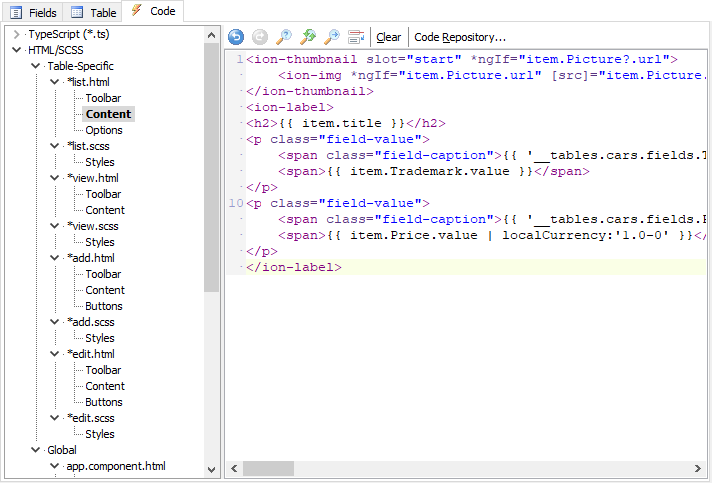
- Scroll down the treeview (or collapse the TypeScript node), select what you want to customize node under the HTML node (see below for details),
- Enter your Custom Template in the editor,
- Generate and run your app again.
What to Replace
| Global |
| app.component.html |
| Menu |
The side menu (<ion-menu> element) |
| settings.html |
| Toolbar |
The top toolbar (<ion-toolbar> element) |
| Content |
The page content (<ion-list> element) |
| settings.scss |
|
SCSS for the settings page |
| login.html |
| Toolbar |
The top toolbar (<ion-toolbar> element) |
| Logo |
The large logo in the page |
| Content |
The page content (<ion-list> element) |
| Buttons |
The buttons at the bottom of the page (<ion-row> element) |
| login.scss |
|
SCSS for the login page |
| signup.html |
| Toolbar |
The top toolbar (<ion-toolbar> element) |
| Content |
The page content (<ion-list> element) |
| Buttons |
The buttons at the bottom of the page (<ion-row> element) |
| signup.scss |
|
SCSS for the login page |
| Table-Specific |
| *add.html |
Add Page of the table |
| Toolbar |
The top toolbar (<ion-toolbar> element) |
| Content |
The page content (<ion-list> element) |
| Buttons |
The buttons at the bottom of the page (<ion-row> element) |
| *add.scss |
|
SCSS for the page |
| *edit.html |
Edit Page of the table |
| Toolbar |
The top toolbar (<ion-toolbar> element) |
| Content |
The page content (<ion-list> element) |
| Buttons |
The buttons at the bottom of the page (<ion-row> element) |
| *edit.scss |
|
SCSS for the page |
| *list.html |
List Page of the table |
| Toolbar |
The top toolbar (<ion-toolbar> element) |
| Content |
The page content (<ion-list> element) |
| *list.scss |
|
SCSS for the page |
| *view.html |
View Page of the table |
| Toolbar |
The top toolbar (<ion-toolbar> element) |
| Content |
The page content (<ion-list> element) |
| *view.scss |
|
SCSS for the page |
| *.html |
Custom File |
| Toolbar |
The top toolbar (<ion-toolbar> element) |
| Content |
The page content (<ion-list> element) |
| *.scss |
|
SCSS for the page |
TIP You can build the HTML quickly by generating a version with the default template first, then customize the *.html in the generated script. When done, copy and paste the HTML to above and save in the project.
Example 1 - Custom Template in List page
<ion-thumbnail slot="start" *ngIf="item.Picture.url">
<ion-img src]="item.Picture.listUrl | authFile | async"></ion-img>
</ion-thumbnail>
<h2>{{ item.Model.value }}</h2>
<p class="field-value">
<span class="field-caption">{{ '__tables.cars.fields.Trademark.caption' | translate }}</span>
<span>{{ item.Trademark.value }}</span>
</p>
<p class="field-value">
<span class="field-caption">{{ '__tables.cars.fields.Price.caption' | translate }}</span>
<span>{{ item.Price.value }}</span>
</p>
Notes
- Use item to represent a record in the List page,
- To get the field value, use item.<FieldName>.value,
- For fields with IMAGE View Tag (see Field Setup), get the URL by item.<FieldName>.listUrl,
- To get the translated field caption, use {{ '__tables.<TableName>.fields.<FieldName>.caption' | translate }}, where <TableName> and <FieldName> are the variable name of the table and the field. In most cases they are the same as the table and field names in the databases, but there are some exceptions, see Tools -> Table and Field Variable Names.
The result:

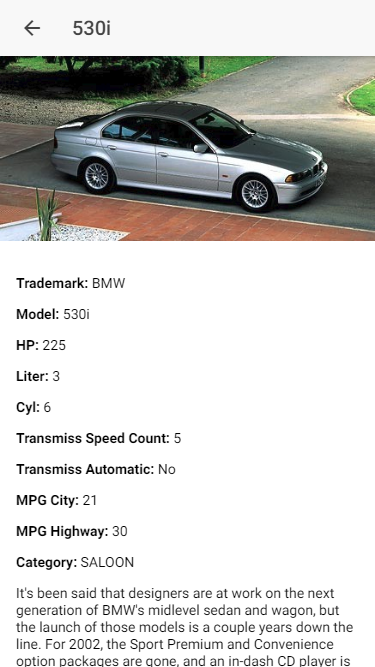
Example 2 - Custom Template in View page
<p class="field-value"><span class="field-caption">{{ '__tables.cars.fields.Trademark.caption' | translate }}</span><span>{{ row.Trademark.value }}</span></p>
<p class="field-value"><span class="field-caption">{{ '__tables.cars.fields.Model.caption' | translate }}</span><span>{{ row.Model.value }}</span></p>
<p class="field-value"><span class="field-caption">{{ '__tables.cars.fields.HP.caption' | translate }}</span><span>{{ row.HP.value }}</span></p>
<p class="field-value"><span class="field-caption">{{ '__tables.cars.fields.Liter.caption' | translate }}</span><span>{{ row.Liter.value }}</span></p>
<p class="field-value"><span class="field-caption">{{ '__tables.cars.fields.Cyl.caption' | translate }}</span><span>{{ row.Cyl.value }}</span></p>
<p class="field-value"><span class="field-caption">{{ '__tables.cars.fields.TransmissSpeedCount.caption' | translate }}</span><span>{{ row.TransmissSpeedCount.value }}</span></p>
<p class="field-value"><span class="field-caption">{{ '__tables.cars.fields.TransmissAutomatic.caption' | translate }}</span><span>{{ row.TransmissAutomatic.value }}</span></p>
<p class="field-value"><span class="field-caption">{{ '__tables.cars.fields.MPG_City.caption' | translate }}</span><span>{{ row.MPG_City.value }}</span></p>
<p class="field-value"><span class="field-caption">{{ '__tables.cars.fields.MPG_Highway.caption' | translate }}</span><span>{{ row.MPG_Highway.value }}</span></p>
<p class="field-value"><span class="field-caption">{{ '__tables.cars.fields.Category.caption' | translate }}</span><span>{{ row.Category.value }}</span></p>
<p innerHTML]="row.Description.value"></p>
<p class="field-value"><span class="field-caption">{{ '__tables.cars.fields.Price.caption' | translate }}</span><span>{{ row.Price.value | currency }}</span></p>
Notes
- Unlike List page, use row to represent the record in the View/Edit/Add page,
- To get the field value, use row.<FieldName>.value,
- For fields with IMAGE View Tag (see Field Setup), get the URL by row.<FieldName>.viewUrl,
- To get the translated field caption, use {{ '__tables.<TableName>.fields.<FieldName>.caption' | translate }}.
The result: