Click Tools in the main menu bar to access the following useful tools available in DB AppMaker.
Synchronization
Advanced Settings
Release Settings (Android)
Copy Table Settings
Copy Field Settings
Sort Tables Alphabetically
Multi-Language Property Editor
Delete Template Cache
Menu Editor
npm Packages
Table and Field Variable Names
During project development, you may occasionally alter your database schema. DB AppMaker provides you with the ability to synchronize your project with the database again. The synchronization process can be invoked in the following situations:
These settings are some advanced general settings, or rarely changed settings for the project, or custom defined settings for use during generation. Click Tools -> Advanced Settings to change these settings:
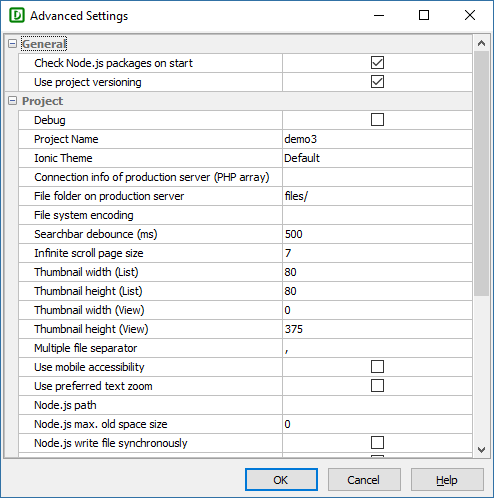
| General | |
| Check Node.js packages on start | When DB AppMaker is opened, it will try to check the latest version of the required Node.js packages and update them. If you want to skip, uncheck this option. |
| Update template on start | Check and update template on start (for registered users only) |
| Use project versioning | Enable project versioning. If enabled, whenever you save your project, a version of the project will be created. You can click Project -> History to view the versions and revert to any version. See Project File for details. |
UI grid scrollbar mode
|
The scrollbar mode of the grids in the UI. Possible values: "Default" or "Classic". If you prefer the old style, switch to "Classic". |
| Auto-Update values (PHP) | The comma separated PHP function names for the Auto-Update feature (see Field Setup). |
| Custom validators (Angular) | The comma separated Angular validator names for the Validate feature (see Field Setup). Make sure you import your validators into the project, see Code.
|
| Project | |
| Debug | Show server error for debugging. |
| Project name | Project name. See Project File for more info.
Note Use only alphanumerical characters in project name. |
| Project ID | Unique ID of the project. Do not change the project ID unless absolutely necessary. See Project File for more info. |
| Searchbar debounce (ms) | For the ion-searchbar in List pages, set the amount of time, in milliseconds, to wait to trigger the ionChange event after each keystroke. Default is 500. |
| Thumbnail width (List) | Thumbnail width in the List page. Default is 80. |
| Thumbnail height (List) | Thumbnail height in the List page. Default is 80. |
| Thumbnail width (View) | Thumbnail width in the View page. Default is 0. If zero, the CSS style max-width: 100% will be used. |
| Thumbnail height (View) | Thumbnail height in the View page. Default is 0. If zero, the default CSS style height: auto will be used. |
| Use mobile accessibility | Use phonegap-plugin-mobile-accessibility. Supports Use preferred text zoom (see below) and fontsize setting (see Settings). |
| Use preferred text zoom | Specify whether or not the app should use the user's preferred text zoom from system settings to scale text within the webview. Requires Use mobile accessibility enabled. |
| Node.js path | Path of Node.js (node.exe). By default DB AppMaker uses the globally installed version of node.exe, e.g. under C:\Program Files\nodejs. If you want to use another version, you can specify your own path, e.g. C:\my\path\. |
| Node.js max. old space size | Memory limit of Node.js (MB). If your project is large, you may need to increase the memory limit, e.g. you can set it to 2048, 3072, 4096, etc.
Notes
|
| Node.js write file synchronously | Write file synchronously. By default, output files are generated asynchronously. Use this setting if writing file synchronously performs better on your system. |
| Node.js garbage collection | Use Node.js garbage collector to clean up memory regularly during generation.
Note Cleaning up memory manually will slow down generation, only enable this setting if you encounter out of memory problem. |
| Android SDK build tools path | For Android only. If you have installed Android Studio, the build tools are usually installed under C:\Users\<user>\AppData\Local\Android\Sdk\build-tools. If this is also the case for your PC, you can leave this setting empty. Otherwise, you must enter your build tools path for building release version of your app. |
| Unaligned APK path | For Android only. Unaligned APK file path for building release version. |
| Unaligned APK file name | For Android only. Unaligned APK file name for building release version. |
| Generate Android App Bundle (AAB) | For Android only. Generate Android App Bundle (AAB) file instead of APK file. An Android App Bundle is a publishing format that includes all your app's compiled code and resources, and defers APK generation and signing to Google Play. |
| Unaligned AAB path | For Android only. Unaligned AAB file path for building release version. |
| Unaligned AAB file name | For Android only. Unaligned AAB file name for building release version. |
| Development team (iOS) | For iOS only. The team ID of a development team to use for signing certificates and provisioning profiles. |
| File system encoding | For non-BLOB field storing file names only. The file name retrieved from the database is in utf-8, but the file name of the physical file in the file folder may be in file system encoding. To make sure the file can be read correctly, you may need to provide the file system encoding if your file names contains non-alphanumerical characters. |
| Connection info of production server (JSON) | Specify connection info of databases for production server in JSON, e.g. { "DB": { "user": "foo", "pass": "bar", "db": "...", ... } } Notes
|
| Database time zone (for SET TIME ZONE) | Specify the database time zone for MySQL/PostgreSQL/Oracle. Specify this setting if you want to specify a time zone for your database(s). |
| Validate NOT NULL fields | By default DB AppMaker will detect fields declared as NOT NULL in the database (and without default value in database or the project) and force "Required" validation. If for some special reason you need to disable this feature, disable this setting. |
| Remove XSS | Specify if sensitive keywords allowing XSS attack should be removed. If enabled, all user input string will be checked against an array of sensitive keywords. If discovered, those keywords will be removed to prevent XSS attack. If this behavior is unwanted, you can disable this feature at your own risk. Re-generate and re-upload the ewcfg.php after changing this setting. XSS removal is done by HTML Purifier with default configuration. |
| Language files | The default language files for a project. (For use with Multi-Language.) |
| Use hierarchical User ID | For used with User ID Security. (see Security Settings.) If enabled, a parent user can view records of child users and grandchild users and so on. If disabled, a parent user can only view records of child users. |
| Use subquery for user ID Security checking in detail tables | For used Master/Detail with User ID Security (see Security Settings) . Default is False. If master table is protected by User ID Security, the detail tables "inherit" the security even they have not the User ID field. This is achieved by checking the master records that the user can access with User ID Security, then limit the detail records to those belonged to the accessible master records. The checking can be done by using subquery but not all databases support subquery, you may want to disable this setting in such cases. On the other hand, if you have large number of detail records and not using subquery makes the SQL too long for your database, then enable this setting if your database supports subquery. |
| Use ADOdb driver for MySQL | Use ADOdb driver if MySQL database is used (by default a lite version MysqlConnection.php is used) |
| Oracle charset | By default the project character is also used for connecting to Oracle. If you need to use a different charset, specify it with this setting. |
| Oracle compare | For setting Oracle's NLS_COMP parameter. Requires Oracle 10gR2 (or later). Possible values are: BINARY, LINGUISTIC, ANSI. For example, if you want to do case insensitive search you can select LINGUISTIC. |
| Oracle sort | For setting Oracle's NLS_SORT parameter. Requires Oracle 10gR2 (or later). For example, if you want to do case insensitive search you can enter "BINARY_CI" (no double quotes). |
| Multiple file upload separator | Specify the file upload separator used to separate the file names. By default, comma is used. If you allow file names with comma, you can enter another separator, e.g. "|". |
| Composite key separator | The separator between key values of a composite key. Default is ",". If your primary key values are of string type and contain commas also, the commas will affect parsing of the composite key value in the script and lead to failure of locating a record, you can change the separator to avoid such problem. |
| Multiple option separator | For use with Dynamic Selection List. Specify the separator for multiple selected values. Default is ",". |
| Allowed image file extensions | File extensions that will be treated as images for download. Comma separated. |
| Allowed non-image file extensions | File extensions that will be treated as non-image download files. Comma separated. |
| Search keywords in any selected fields (Quick search) | For use with "All words"option of Quick Search, allows searching all keywords in any fields selected for Quick Search. When searching "All words" with Quick Search (see Table Setup), by default all keywords must be found in the same field. This option provides an alternative searching behavior. |
| Search multiple value option | Option for searching fields that store multiple values as comma separated string. Valid values are: (Default is 3) |
| Use ILIKE operator (PostgreSQL) | Use ILIKE instead of LIKE for case-insensitive search (for PostgreSQL only). |
| Collation for LIKE operator (MySQL) | Use the specified COLLATION for the LIKE operator (for MySQL only). |
| Collation for LIKE operator (Microsoft SQL Server) | Use the specified COLLATION for the LIKE operator (for Microsoft SQL Server only). |
| Use password hash | For used with Hashed password, see Security Settings. If this setting is enabled, PHP password_hash function will be used to create password hash. By default CRYPT_BLOWFISH algorithm will be used. If this setting is disabled, the old md5 function will be used. |
| Use place holder | Add placeholder attribute to form elements automatically. Possible values are:
|
| Web root relative path | Path of the web root relative to project folder. The project folder is the folder where the generated scripts reside. All relative paths (e.g. file upload paths) are relative to the web root. By default the web root is same as the project folder, so the value of this setting is "." (no quotes) or empty. It is recommended that you use this default value, only change it if you must use a web root folder which is not the same as the project folder. Note Web root relative path MUST be a physical ancestor folder of the project folder, say, the physical parent folder of the project folder. It cannot be a virtual path. Therefore, the value can only contains ".", ".." and "/". |
| Create upload file on copy | Specify if an uploaded file should be copied when copying a record with file upload fields. (For use with file upload to folder.) Default is false. |
| Use URL rewrite | If enabled, .htaccess and web.config will be generated for Apache and IIS web servers. For PHP API only. Default is false. |
| Use IIS custom headers | If enabled, Access-Control-Allow-Origin, Access-Control-Allow-Headers and Access-Control-Allow-Methods headers will be issued by IIS. For PHP API only. Default is true. |
| Use Apache custom headers | If enabled, Access-Control-Allow-Origin, Access-Control-Allow-Headers and Access-Control-Allow-Methods headers will be issued by Apache. For PHP API only. Default is true. |
| API JWT signing secret key | The secret key used to sign the JSON Web Token (JWT). Non-optional, make sure you use different values for different projects and keep it in a secret place |
| API JWT signing algorithm | The algorithm used to sign the JWT. Default is "HS512". For more possible values refer to JWT web site: https://jwt.io/introduction/ |
| API JWT authorization header | The name of the header storing the JWT. Default value is "X-Authorization". |
| API access time after login (seconds) | Time you can access the protected resources after login. Default value is 0. |
| API expire time after login (seconds) | The JWT expiry time. Default value is 3600 (60 minutes). Users will need to authenticate again once the JWT expires. |
| API Access-Control-Allow-Origin header | The Access-Control-Allow-Origin. If unspecified, default value is "*" so the API can be accessed by external apps. |
Release Settings are settings required for signing your app before publishing it, make sure you enter all of them.
Android
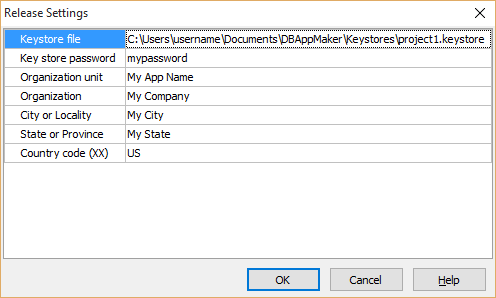
| Key store file | A keystore is a binary file that contains a set of private keys. You must keep your keystore in a safe and secure place. Specify the path of your keystore, if the file does not exist, it will be created. Make sure you specify a valid path, e.g. a subfolder under your personal folder, C:\Users\<username>\Documents\DBAppMaker\Keystores\<project name>.keystore. |
| Key store password | Password of the keystore. (Do not use comma.) |
| Organization unit | Organization unit (Do not use comma.) |
| Organization | Organization (Do not use comma.) |
| City or Locality | City (Do not use comma.) |
| State of Province | State or province (Do not use comma.) |
| Country Code (XX) | Two character country code |
Read Tutorial - Building your App for Release (Android) for details.
If you use database built-in query/view to make an alternate version of a table, you need to set up the table and field settings again, this tool help you quickly copies table and field settings from the source table to the view. Click Tools -> Copy Table Settings to open the following form:
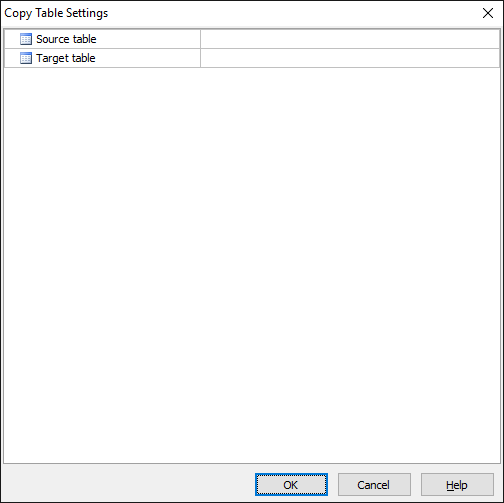
Select the Source table and the Target table, click OK to copy the table settings. If a field in the target table has the same name as that in the source table, field settings will also be copied.
This tool help you quickly copies field settings from the source table to the view. Click Tools -> Copy Field Settings to open the following form:
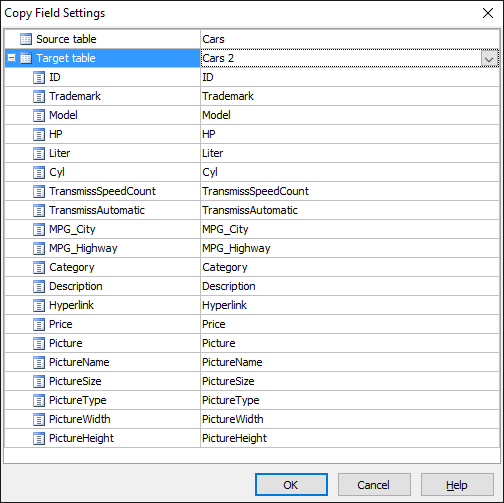
Select the Source table and the Target table, the fields of the target table will be listed in the left column, you can then select the respective source fields (from the specified source table) in the right column and click OK to copy the field settings.
If you prefer to have the table list displayed in the user interface in alphabetical order, click Tools -> Sort Tables Alphabetically to do so.
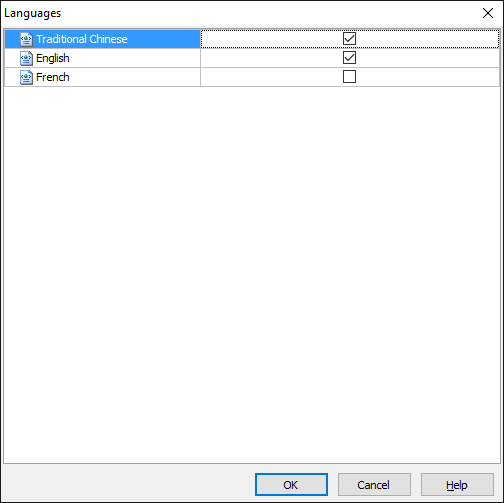
If you want to use multi-language project, click Tools -> Languages to select the languages you want to use in the project. See Multi-Language Project for more details.
Some text properties support Multi-Language. This editor allows you to enter your property values for each language. See Multi-Language Project for details.
DB AppMaker will unzip the template zip file to a temporary folder to speed up code-generation. We refer to the temporary folder as "template cache", sometimes the template cache may become corrupted resulting from, for example, generating with a corrupted template or badly customized template. In these cases you may want to delete bad template cache and let DB AppMaker builds the template cache again. You can do so by either clicking Tools -> Delete Template Cache or by manually removing the cache folder, i.e. C:\Users\<user>\AppData\Roaming\<product name>\<template file name>. (Also see Customizing Template.)
When you start DB AppMaker, it will try to check if there is an updated template on the official website and download the new template to replace the existing template on your machine. Your PC must be connected to the internet for this feature to work.
Notes
To open the menu editor, click Tools -> Menu Editor in the main menu or click the "Menu Editor" icon in the toolbar.
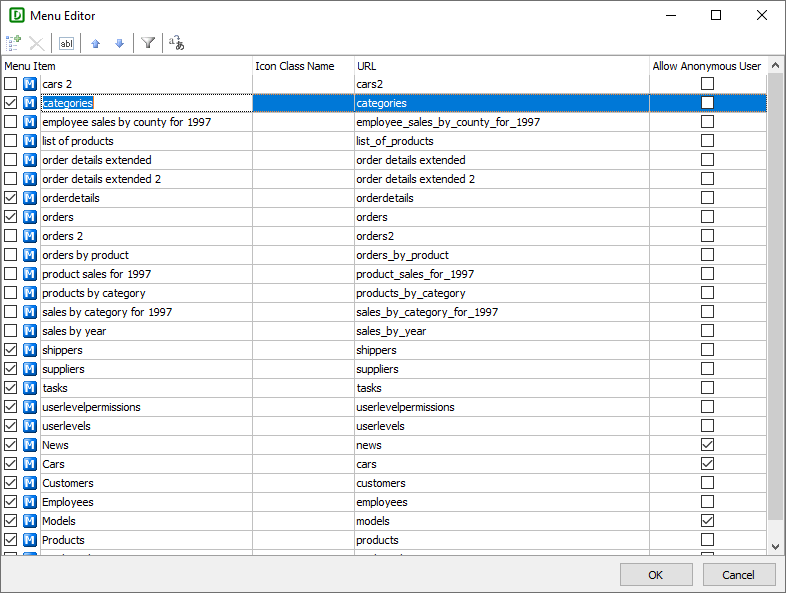
Use the following toolbar buttons to manage your menu items:
| Add item | Add a new menu item. You can add new menu items and link them to your own URLs. Just click the button to add and then enter your URL. |
| Delete | Delete the focused menu item |
| Edit item | Edit the displayed text of the focused menu item. You can also click the text directly to edit. |
| Move Up | Move the menu item up |
| Move Down | Move the menu item down |
| Filter | Show selected menu items only |
| Multi-Language | Show Multi-Language Property Editor for editing unicode menu text |
The properties of menu item are:
| Menu Item | You can show/hide the menu items by checking/unchecking the checkboxes beside the menu item text. You can also change the menu caption, if you want to use special characters in the menu caption, you can use HTML entities. |
| Icon Class Name | The Ionicons name for the menu item, e.g. airplane-outline. |
| URL | URL of menu item. By default it is same as the table name. That is, if the menu item is for a table, the URL is that of the List page of the table by default. If the menu item is for a Custom File, the URL is that of the Custom File. If the menu item is a custom menu item, you can enter your own URL. Note that your URL must be a valid route defined in app-routing.module.ts of the app. |
| Allow Anonymous User | If the page can be viewed by anonymous user without login, enable this option. For tables, this setting is same as the List permission for the Anonymous user level in Advanced Security. (See Security Settings.) |
After modifying, make sure you click OK to save the changes.
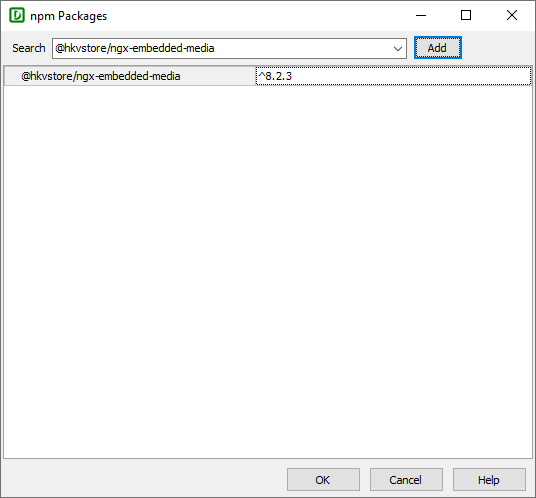
You can add your npm packages to the project. Search for the package you want in the Search box, select and then click the Add button to add the package to the project. The latest version will be inputted automatically. If you need to use other version, enter your version number manually. To delete a package, right click the item and select Delete.
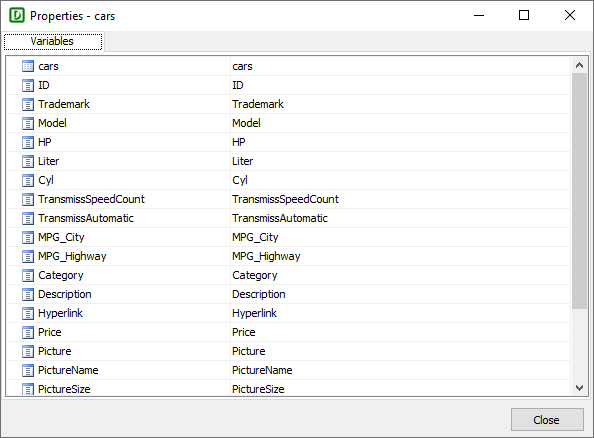
When writing code, you need to specify table or field by its variable names.
If the table/field name is alphanumeric, the table/field variable name is same as the table/field name. Otherwise, spaces are replaced by underscores, and other non alphanumeric characters are replaced by their hexadecimal string representation of their unicode value. If the variable is a reserved word or starts with a digit, it will be prepended with an underscore. To check the table/field variable names used by the project, you can go the Database pane, right click a table and select Properties, you will see the table/field variable names, e.g.