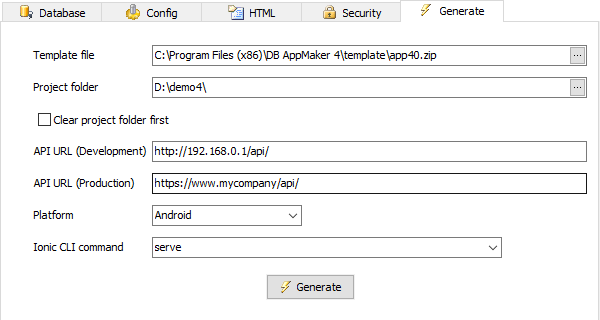
Generate Settings
|
Template file |
Template archive (zip file) |
|
Project folder |
The folder where the mobile app is to be generated. It is recommended that you use a folder without permission concerns, e.g. D:\demo4\. |
| Clear project folder first |
Clear the project folder before generation.
Notes
- If the project folder ALREADY EXISTS and contains files from previous project or other project, you must clear the project folder first.
- NOT all folders and files will be cleared, for example, the node_modules will be kept so that you don't need to download again.
- It is not always possible to delete files and folders programmatically, some files might still be held by some background processes. You may need to use Windows's File Explorer to go to the folder and delete those files manually. If it fails, open Windows's Task Manager, look for Node.js, Java, adb.exe, etc. and end them manually first.
|
| API URL (Development) |
The API URL of the development server (usually your PC). Make sure you have set up your web server and created a site for the API, e.g. http://192.168.0.1/api/.
Notes
- This is usually with command serve (see below) during development.
- Usually this URL is local, but using IP address instead of "localhost" is recommended because when testing the app on your mobile device (with command cordova run android, see below), "localhost" is a wrong URL for the device.
|
| API URL (Production) |
The API URL of the production server. Make sure you upload all generated PHP scripts (including all files and folders) to your server and set up the URL of the index.php here. The URL MUST be accessible by the app installed on mobile devices, e.g. http://www.mycompany.com/api/.
Notes
- This is the real URL for the production server. During development (e.g. with the command serve, see below), you can use the API URL (Development) (see above).
- If the connection info on your production server is different from that you entered in the user interface, you can use the advanced setting Connection Info of production server (see Tools -> Advanced Settings) to specify.
- If you use SQLite, by default the database will be copied to <project folder>\api\, make sure you upload the database to your production server. If you upload to an alternative path, use advanced setting Connection Info of production server (see Tools -> Advanced Settings) to specify the actual relpath (relative path) of the database folder on your server. The relative path is relative to the index.php under the API folder.
|
| Platform |
Platform of the mobile app. Supported platforms are: Android or iOS.
Important Notes
If you want to build your app for the other platform, after successfully building the app for one platform, do the follows:
- Change this setting to the other platform,
- Enable Delete project folder first (see below) if you generate files to the same project folder,
- Re-generate ALL files.
|
| Ionic CLI command |
Specify the Ionic CLI command to execute after generation. Possible values are:
| (none) |
Do not run any command. There are many cases you do not want to run any command, for example,
- ionic serve (see below) is already running and you just want to re-generate some files and let ionic serve recompile the project automatically,
- You'll run your own command in PowerShell,
- You opened the project by other tools (e.g. Visual Studio Code or Xcode).
How To Open PowerShell In A Specific Location In Windows 10
- In File Explorer, navigate to the project folder (e.g. D:\demo4). In the address bar, type powershell and hit Enter, OR
- In File Explorer, shift-right-click the project folder in the left pane (or the whitespace of the project folder in the right pane) and select Open PowerShell window here.
|
| serve |
Run ionic serve - Start a local dev server for app dev/testing. Supports Android only. |
| build |
Run ionic build - Build web assets and prepare your app for any platform targets. Supports Android only. |
| build --prod |
Run ionic build using the production configuration - Build web assets and prepare your app for any platform targets. Supports Android only. |
| cordova run android |
Run ionic cordova run android - Run an Ionic project on a connected device. Supports Android only. |
| cordova build android |
Run ionic cordova build android - Build (prepare + compile) an Ionic project for a given platform. Supports Android only. |
| cordova build android --prod --release |
Run ionic cordova build android using the production configuration - Build the app as .aab or .apk file for release to Google Play (Android). Supports Android only.
Notes
- If you did not enter your release settings before, the Release Settings form will popup during generation. Make sure you enter all settings, then press OK to continue. Before generation, you can also click Tools -> Release Settings to open the setup form and enter your settings.
- By default Android App Bundle (AAB) file will be outputted. If you want to output APK instead, you can disable the advanced setting Generate Android App Bundle (AAB), see Tools -> Advanced Settings.
- DB AppMaker does not only run cordova build android --prod --release but also sign the app for you, see Tutorial - Building your App for Release (Android).
|
Note You can add more commands at the registry setting HKEY_CURRENT_USER\Software\DBAppMaker\4.0\Settings\General\IonicCliCommands, However, DO NOT change the original commands.
Notes for iOS
- The Build, Run, and Release commands support Android only. If you want to works with iOS, you should select nothing (None).
- To test the project on your Mac computer after generation (see Preparing Mac for iOS App Development first), open Terminal at the project folder and run:
npm install (to install npm packages according to your project settings)
npm rebuild node-sass --force (for node-sass, to re-build the binding for your current environment, optional, only required if you ran npm update in the same folder for Android before)
ionic serve (use Ionic CLI to test the app in browser)
If you get Error: spawn EACCES, you may have permission issues, you can try run the following command to change permissions and then try ionic serve again:
sudo chmod -R a+rwx .
- To build your project, open the generated app with Xcode on your Mac computer and follow Deploying to a Device -> iOS Devices.
|
Notes for API
- Web server supporting PHP >= 5.6 is required. The PHP extension for the database type must also be installed.
- If you use MS SQL Server, Microsoft Drivers for PHP for SQL Server must be installed on the server.
- If you have changed any table/field settings, make sure you re-generate and re-upload the API to your server again.
- By default API scripts will be generated under <project folder>\api, but you can change it to another folder by changing the advanced setting of the extension, see Using Extensions for details.
After setting above, click the Generate button to generate scripts. DB AppMaker allows you select the files to generate, just select the files you want to generate in the Output column.
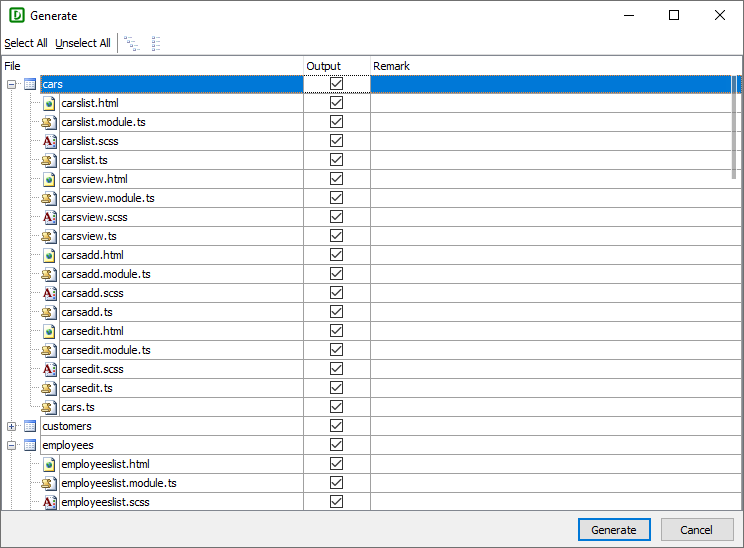
You can also right-click the column header of Output to quickly select all or unselect all items in the column.
After selection, click the Generate button to generate the app.
Notes
- If it is your first generation or you have changed some project level settings, you must select Other files to generate the non table-specific pages.
- If you modify settings for a table and want to re-generate files for that table only, you can click Unselect All, then select the files you want to re-generate only.
- If you are not sure which files to re-generate, always click Select All and re-generate all files.
- You can press F9 to skip above form and generate all scripts.
- You can press Ctrl + F9 to skip above form and re-generate previously selected scripts.
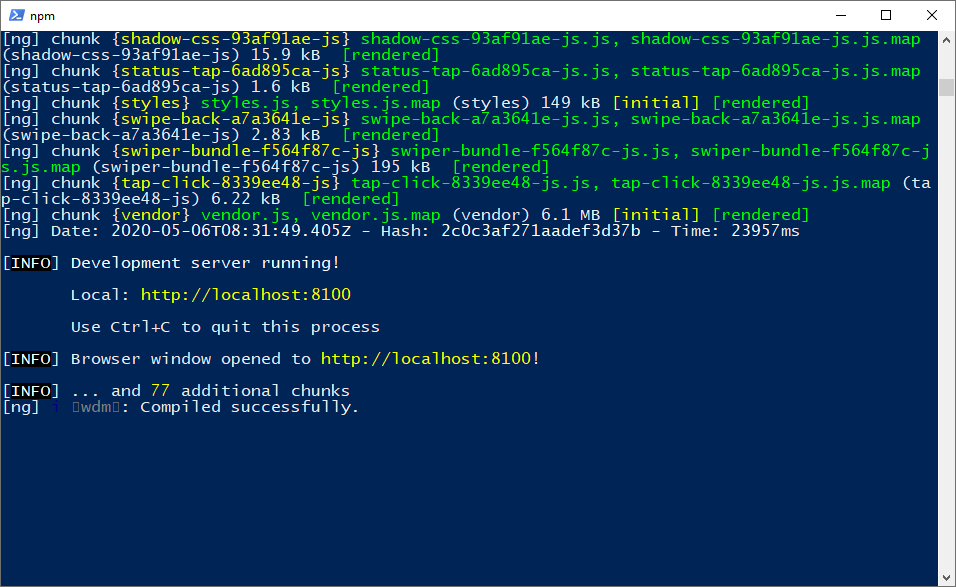
After generating scripts, If you have selected a command (e.g. build), the project will be built.
Note During the building process, many packages will be downloaded from the internet by the Ionic CLI, make sure your PC is connected to internet.
When building, the Generate button will be changed to the Abort button, if you need to abort generation in the middle of the process, click the Abort button.
Note It is not always possible to abort programmatically. If it fails, open Windows's Task Manager, look for Node.js, Java, adb.exe, etc. and end them manually.
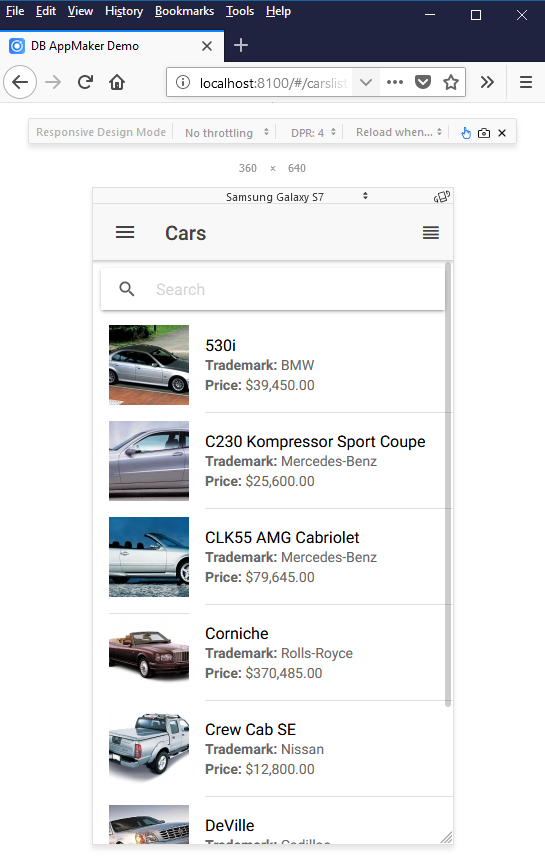
If you have selected the command serve, after building the project, the generated app will be opened by ionic serve like this:
Then it will open browser with URL http://localhost:8100/ to run the app:
Notes
- You can use either command prompt or PowerShell to test your app, just change to the project directory and type ionic serve.
- If you make minor changes to the project, you can just re-generate the related files. Ionic serve will re-build the project automatically.
- If you make major changes to the project, or you enable Clear project folder first, you should re-generate all scripts, press Ctrl+C to stop ionic serve before generation and and start ionic serve again after generation.