Tutorial - Building your App for Release (Android)
In this tutorial we will show you how to prepare your app for release.
We will use the demo database for demonstration.
1. Setup your project
- Run DB AppMaker and open the demo project.
- If the database connection information for development is not same as that for production, click Tools -> Advanced Settings, find Connection info of production server (PHP array), enter your connection information of your production database, see examples here.
- If you have file upload fields, click the Config -> General tab, make sure the Upload folder is correct for your production server. If you have field-specific upload folders (see Field Setup -> Edit Tag), make sure they are correct for your production server too.
2. Configure the release settings
In the Config -> Platforms tab, enter all the information for the app. Read Config Settings for details.
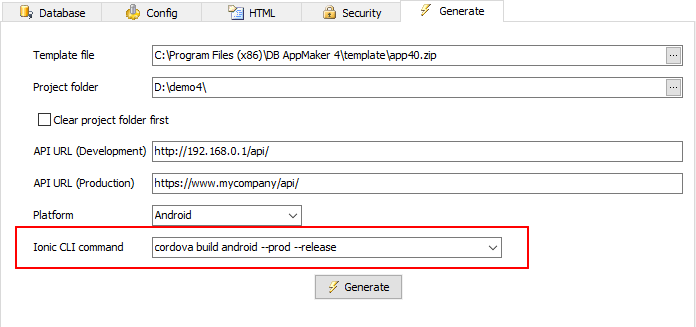
3. Generate and sign the app
- Go to the Generate tab, change the Project folder if necessary, it is recommended that you use a folder without permission concerns, e.g. D:\demo4\,
- Make sure the API URL (Production) is correct, the URL should be public and accessible by mobile apps, secured site (with HTTPS) is recommended,
- Set the Platform as Android,
- Set the Command as cordova build android --prod --release,
- Click the Generate button. DB AppMaker will start creating your app for release.
If you have not entered your release settings before, the Release Settings form will show up:
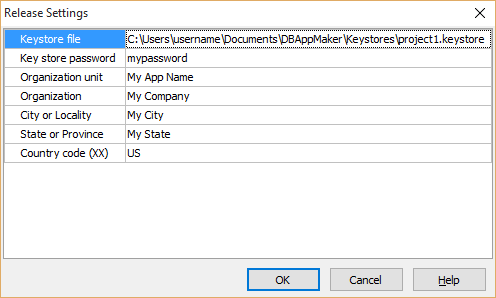
Enter release information for your app, then click OK to continue.
After script generation, DB AppMaker will perform the following actions automatically for you:
- Generate a private key using keytool. The private key generated will be stored to the keystore file you specify.
Important Please backup and keep the keystore file in a safe place. You will need to use same keystore file to sign the different versions of the same app in the future
- Build your app in release mode to produce an unsigned AAB (or APK).
- Sign your app with the keystore file generated above using jarsigner.
- Verify that your AAB (or APK) is signed.
- Align the final AAB (or APK) using zipalign.
When the process is successful, the signed AAB (or APK) file will be created in the output folder <project folder>\platforms\android\app\build\outputs. You can now upload the file to Google Play.
For more information about the Android signing process, please read: Sign your app
4. Submit your app to Google Play
To submit your app to Google Play, you need to sign up for a Google Play developer account first. After you've signed up for a Google Play developer account, you can upload apps to Google Play using your Play Console.
Tip When building your app, use Google Play's recommended publishing format, the
Android App Bundle.
- Go to your Play Console.
- Select All applications -> Create application.
- Select a default language and add a title for your app. Type the name of your app as you want it to appear on Google Play.
- Create your app's store listing, take the content rating questionnaire, and set up pricing and distribution.
For more information about how to submit your app to Google Play, please read: Upload an app.