
To further customize your app, you can implement your own business logic by adding your own code. Your code is stored in the project so you can migrate your project to other templates or future versions easily. This feature reduces the need of template customization and create maximum possibilities for you to customize and create more advanced features for your projects.
After loading the database, the database objects (tables or views) will be shown in the left pane (the database pane). Click on any table to go to the Field Setup Page and then select the Code tab.
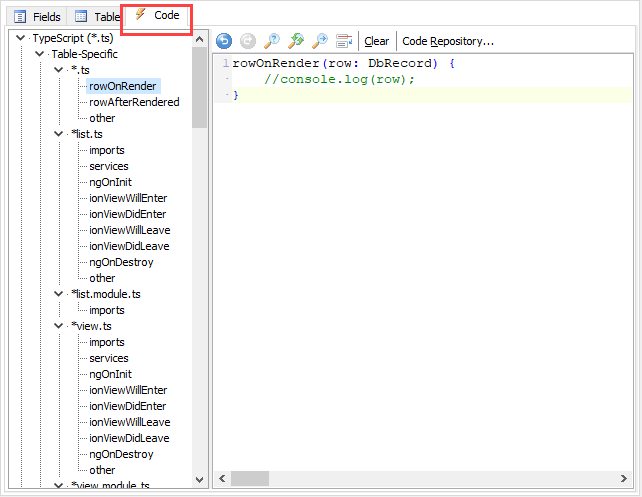
The treeview shows what you can add to your project. To add your code, select an item in the treeview, then enter your code in the editor.
Notes
The editor supports Find and Replace. Press Ctrl-F to open the Find dialog and press Ctrl-H to open the Replace dialog.
You can click the Clear button to discard the existing code and reset.
Code Repository
DB Appmaker provides a Code Repository for easy reuse of your code across projects and sharing with other users. Click the Code Repository button to open it, categorized reusable code will be displayed:
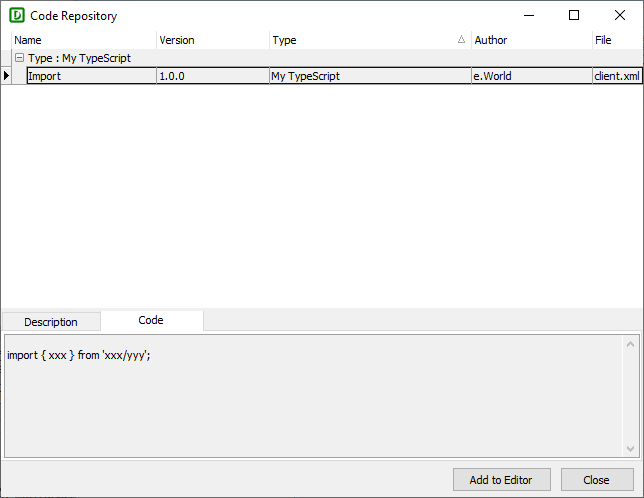
You can add the code to the editor by clicking the Add to Editor button. The reusable code is stored in XML files which reside in s subfolder name "code" under the installation folder. The format of the XML files is simple, there are 2 parts:
There are some sample files in the "code" folder, you can copy and modify for your own code and then save them under the "code" folder for reuse.
TypeScript
| TypeScript -> Table-Specific | |
| *.ts | Service for the table |
| rowOnRender | This event will be fired before rendering a record. The event has only one argument, i.e. rowOnRender(row: any) {...}, where row is a DbRecord object representing the record, you can use console.log(row) to view the record first (see below). |
| rowAfterRendered
|
This event will be fired after rendering a record. The event has only one argument, i.e. rowAfterRendered(row: any) {...}, where row is a DbRecord object representing the record. After rendering, the row object contains rendered data of all fields for the page, each field is a property of the row object, each field is a DbField object. Prior to customizing the field values, you may want to view the row's properies in the console first so that you know what to customize. Example 1 - Set record title (override Title field, see Table Setup) rowAfterRendered(row: any) { Example 2 - Hide a field conditionally rowAfterRendered(row: any) { Example 3 - Change field value rowAfterRendered(row: any) { If you use the command ionic serve to test the app in your browser, the row will be logged in Chrome DevTools Console (press Control+Shift+J in Chrome), view the properties and then customize the row. Notes
|
| other | Class members to be added for the class. |
| *list.ts, *view.ts, *add.ts, *edit.ts | List/View/Add/Edit page of the table |
| imports | Additional import statement for the page, e.g. import { FooService } from './foo.service';
Note If the service is from npm package, click Tools -> npm Packages to add the package to the project first.
|
| services | Additional services (comma separated) to be injected into the page, e.g. public fooService: FooService, |
| ngOnInit | Fired once during component initialization. This event can be used to initialize local members and make calls into services that only need to be done once. See Ionic Page Life Cycle. |
| onViewWillEnter | Fired when the component routing to is about to animate into view. See Ionic Page Life Cycle. |
| ionViewDidEnter | Fired when the component routing to has finished animating. See Ionic Page Life Cycle. |
| ionViewWillLeave | Fired when the component routing from is about to animate. See Ionic Page Life Cycle. |
| ionViewDidLeave | Fired when the component routing to has finished animating. See Ionic Page Life Cycle. |
| ngOnDestroy | Fired right before Angular destroys the view. Useful for cleanup like unsubscribing from observables. See Ionic Page Life Cycle. |
| other | Class members to be added for the class. |
| *list.module.ts, *view.module.ts, *add.module.ts, *edit.module.ts | Module of the List/View/Add/Edit page |
| imports | Additional import statement for the page, e.g. import { FooModule } from 'some-package'; Notes
|
| TypeScript -> Global | |
| app.component.ts | App component |
| imports | Additional import statement for the page, e.g. import { FooService } from './foo.service'; Note If the service is from npm package, click Tools -> npm Packages to add the package to the project first. |
| services | Additional services (comma separated) to be injected into the page, e.g. public fooService: FooService, |
| ngOnInit | Fired once during component initialization. This event can be used to initialize local members and make calls into services that only need to be done once. See Ionic Page Life Cycle. |
| ngOnDestroy | Fired right before Angular destroys the view. Useful for cleanup like unsubscribing from observables. See Ionic Page Life Cycle. |
| other | Class members to be added for the class. |
| ngOnInit | Runs when the page has loaded. This event only happens once per page being created. If a page leaves but is cached, then this event will not fire again on a subsequent viewing. The ngOnInit event is good place to put your setup code for the page. |
| other | Class members to be added to the class of the component. |
| app.module.ts | App module |
| imports | Additional import statement for the app, e.g. import { FooModule } from 'some-package'; Notes
|
| providers | Additional providers (comma separated) for the app. |
| settings.ts, login.ts, signup.ts | Settings/Login/Signup page |
| imports | Additional import statement for the page, e.g. import { FooService } from './foo.service'; Note If the service is from npm package, click Tools -> npm Packages to add the package to the project first. |
| services | Additional services (comma separated) to be injected into the page, e.g. public fooService: FooService, |
| ngOnInit | Fired once during component initialization. This event can be used to initialize local members and make calls into services that only need to be done once. See Ionic Page Life Cycle. |
| onViewWillEnter | Fired when the component routing to is about to animate into view. See Ionic Page Life Cycle. |
| ionViewDidEnter | Fired when the component routing to has finished animating. See Ionic Page Life Cycle. |
| ionViewWillLeave | Fired when the component routing from is about to animate. See Ionic Page Life Cycle. |
| ionViewDidLeave | Fired when the component routing to has finished animating. See Ionic Page Life Cycle. |
| ngOnDestroy | Fired right before Angular destroys the view. Useful for cleanup like unsubscribing from observables. See Ionic Page Life Cycle. |
| other | Class members to be added for the class. |
| settings.module.ts, login.module.ts, signup.module.ts | Module of the Settings/Login/Signup page |
| imports | Additional import statement for the page, e.g. import { FooModule } from 'some-package'; Notes
|
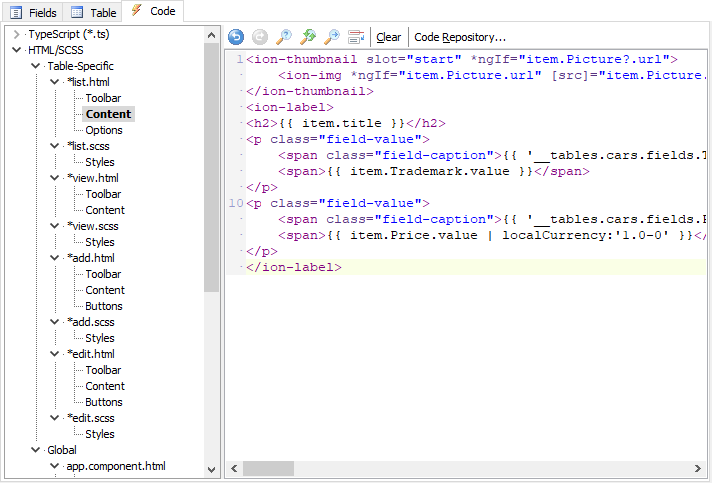
HTML/SCSS
| HTML/SCSS -> Table-Specific | |
| *list.html | List page of the table |
| Toolbar | Toolbar template to replace ion-toolbar at the top of the page. |
| Content | Content template to replace ion-label inside ion-item. Each ion-item represents a record. |
| Options | Options template to replace the ion-item-options inside ion-item-sliding. For List page with Copy/Edit/Delete enabled. |
| *list.scss | SCSS for List page of the table |
| Styles | SCSS styles for the page. |
| *view.html | View page of the table |
| Toolbar | Toolbar template to replace ion-toolbar at the top of the page. |
| Content | Content template to replace HTML inside ion-content. |
| *view.scss | SCSS for View page of the table |
| Styles | SCSS styles for the page. |
| *add.html | Add page of the table |
| Toolbar | Toolbar template to replace ion-toolbar at the top of the page. |
| Content | Content template to replace the ion-list of the page. |
| Buttons | Buttons template to replace the buttons at the bottom of the page. |
| *add.scss | SCSS for Add page of the table |
| Styles | SCSS styles for the page. |
| *edit.html | Edit page of the table |
| Toolbar | Toolbar template to replace ion-toolbar at the top of the page. |
| Content | Content template to replace the ion-list of the page. |
| Buttons | Buttons template to replace the buttons at the bottom of the page. |
| *edit.scss | SCSS for Edit page of the table |
| Styles | SCSS styles for the page. |
| HTML/SCSS -> Global | |
| app.component.html | App component |
| Menu | Menu template to replace ion-menu of the page. |
| settings.html | Settings page |
| Toolbar | Toolbar template to replace ion-toolbar at the top of the page. |
| Content | Content template to replace the ion-list of the page. |
| settings.scss | SCSS for Settings page |
| Styles | SCSS styles for the page. |
| login.html | Login page |
| Toolbar | Toolbar template to replace ion-toolbar at the top of the page. |
| Content | Content template to replace all ion-item inside ion-list of the page. Each ion-item represents a field. |
| Buttons | Buttons template to replace the buttons at the bottom of the page. |
| login.scss | SCSS for Login page |
| Styles | SCSS styles for the page. |
| signup.html | Signup page |
| Toolbar | Toolbar template to replace ion-toolbar at the top of the page. |
| Logo | Logo template to replace ion-toolbar at the center of the page. |
| Content | Content template to replace the ion-list of the page. |
| Buttons | Buttons template to replace the buttons at the bottom of the page. |
| signup.scss | SCSS for Signup page |
| Styles | SCSS styles for the page. |